Saturday, July 31, 2010

Share a Printer Wirelessly Using Your AirPort Express

1 comments
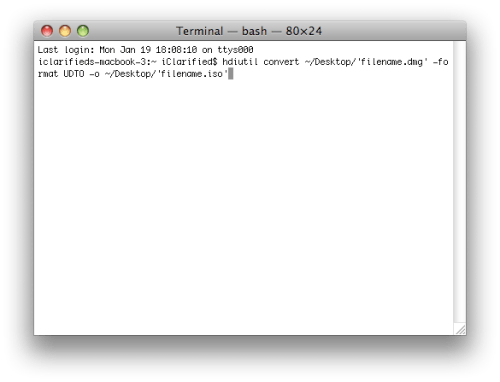
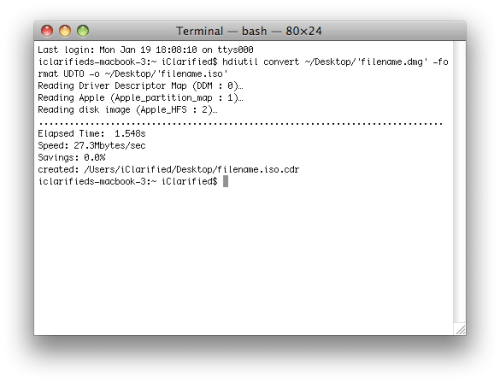
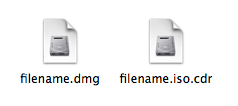
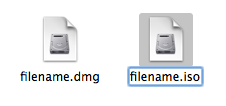
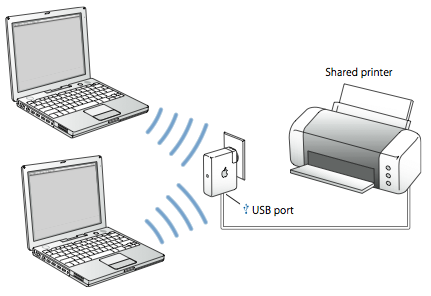
These are instructions on how to share your USB printer wirelessly via your Apple AirPort Express.
Step One
Configure your AirPort Express to create a new network.
Step Two
Connect your printer to the AirPort Express via USB cable.

Step Three
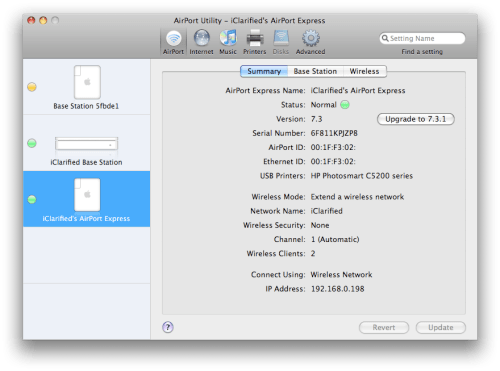
Launch 
AirPort Utility from your Applications:Utilities folder.

Step Four
Select your AirPort Express from the list on the left and confirm that it has detected your USB Printer.
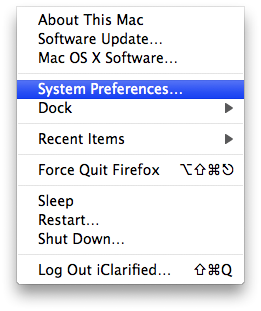
Step Five
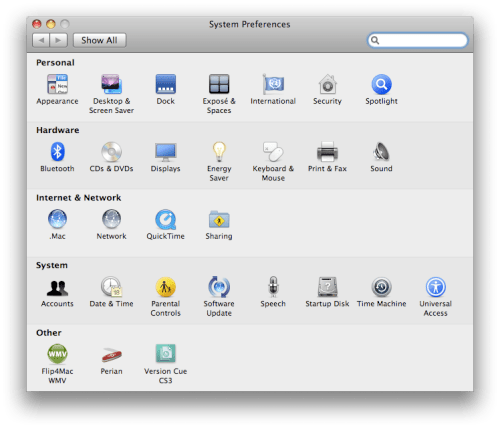
Select 
Preferences from the Apple Menu at the top left of your screen.
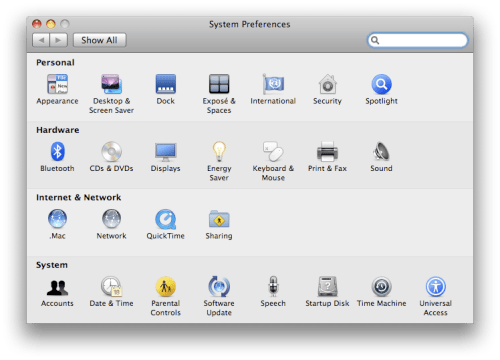
Step Six
Select 
Print & Fax from the Preferences window
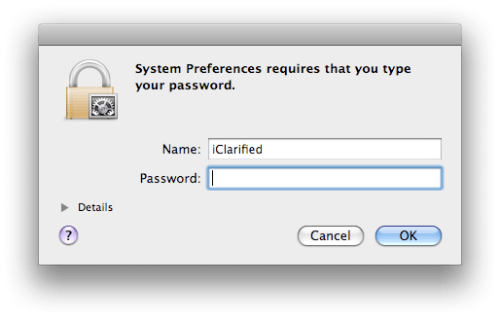
Step Seven
Check the bottom of the Print & Fax window to see if your settings have been locked. If the settings are locked click the lock.


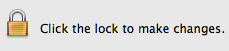
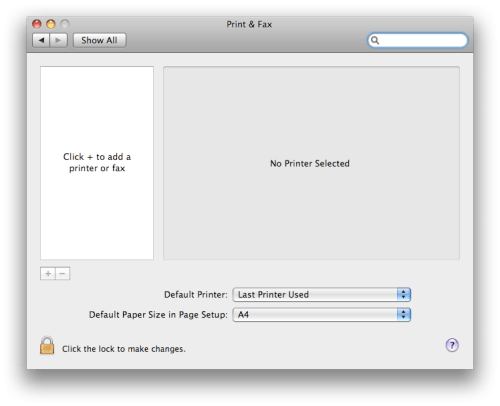
You will be asked to enter an administrator username and password. Do so and click the 
OK button.

Step Eight
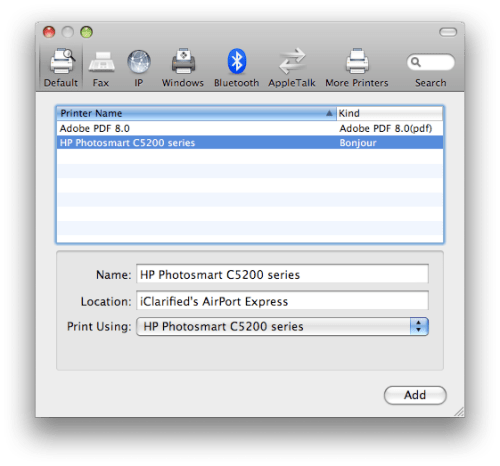
Click the 
+ button on the left side of the window to add a new printer.

Step Nine
Your printer will appear under the 
Default tab. Select it then click the Add button.

Step Ten
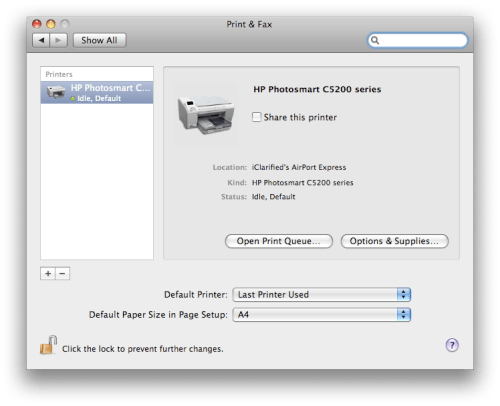
Your printer will now appear in the Print & Fax window and is ready for use!

Change Your Boot Disk in OS X

0 comments
To change the disk your computer boots from is easy. You can do this right from System Preferences in Mac OS X Leopard. You might want to do this if you want to boot from an external disk or network drive. Follow these steps:
Step One
Select 
System Preferences from the Apple menu at the top left hand corner of the screen.

Step Two
Select the 
Startup Disk icon from the System Preferences window.


Step Three
The Startup Disk Preference Window will popup.

Step Four
Click the lock at the bottom left of the window.

Step Five
A window will popup asking you to enter your administrator username and password. Enter your username and password then click the 
Ok button.

Step Six
Notice the lock at the bottom left hand corner of the window becomes unlocked.

Step Seven
Select the disk you would like to use as your start up disk from the list across the top of the window.

Step Eight
Click the 
Restart button to restart the computer and set your new Startup Disk.

Partition a Hard Drive Using Mac OS X Disk Utility

0 comments
These are instructions on how to partition a hard drive using Mac OS X Disk Utility.

Step One
If your hard drive is an external drive, connect it to the computer. Launch Disk Utility from the Applications:Utilities folder.


Step Two
From the list on the left select the drive you would like to format


Step Three
Click to select the Partition tab.


Step Four
From the Volume Scheme dropdown select the number of partitions you would like to create on the drive.


Step Five
Select a Partition (ie Untitled 1) then give it a Name, Format, and Size.


Step Six
You can also drag the handle between the partition boxes to resize the partitions.


Step Seven
Select the remaining partitions and enter their Volume Information.


Step Eight
Note you can use the Plus and Minus buttons to add or remove partitions.


Step Nine
Press the Options... button to choose a partition scheme for the hard disk.


To use the disk to start up an Intel Mac select GUID Partition Table. To use the hard disk to start up a PowerPC Mac select Apple Partition Map. To use the disk to start up a Windows computer select Master Boot Record. Press the OK button to set this option.


Step Ten
Press the Apply button to begin partitioning.


Step Eleven
A window will popup asking you to confirm the partitioning. Please note this will permanently erase all data from the disk. Click the Partition button to continue.


Step Twelve
Notice the status bar shows the progress of the partitioning.


Step Thirteen
Once the partitioning is complete Disk Utility will update and show the new volume information for your hard disk!

Convert a DMG to ISO Using Terminal

1 comments
These are instructions on how to convert a DMG image file to an ISO image file using Mac OS X Terminal. You may want to do this if you need to burn a DMG image using a Windows or Linux operating system.
Step One
Place the DMG you would like to convert on your desktop then open a new 
Finder window by clicking its icon in the dock.

Step Two
Click to select 
Applications from the list of Places on the left.

Step Three
Double click to open the 
Utilities folder from list of Applications.

Step Four
Double click to launch 
Terminal from the list of Utilities.

Step Five
Enter the following command into the Terminal window.
hdiutil convert ~/Desktop/'filename.dmg' -format UDTO -o ~/Desktop/'filename.iso'


NOTE*: Remember to replace 'filename' with the name of your DMG image.
Step Six
You will now notice a new file appear on your desktop with a .iso.cdr extension. Select the file and hit the
Enter key to rename it removing the .cdr extension.


You may be asked to confirm this. Click to select 
Use .iso.

Step Seven
You can now copy this to any Windows or Linux computer for burning.

Spoof Your Airport MAC Address in Snow Leopard

0 comments
These are instructions on how to change or spoof your wireless adapter's MAC address in Snow Leopard.

A Media Access Control address (MAC address) is a unique identifier assigned to most network adapters or network interface cards. 

Please note these instructions worked for us with a MacBook Pro running Snow Leopard 10.6.2. We cannot confirm that they will work for other operating systems or devices.

Step One
Launch Terminal from your Applications:Utilities folder.


Step Two
Enter ifconfig en1 | grep ether to find the current MAC address for your wireless network adapter.


Step Three
Make sure your Airport is turned on and input the following into the Terminal window to disassociate from all networks.

sudo /System/Library/PrivateFrameworks/Apple80211.framework/Versions/Current/Resources/airport -z


When asked input your administrative password, do so.


Step Four
Input the following command to change your MAC address

sudo ifconfig en1 ether 00:11:22:33:44:55

Replace 00:11:22:33:44:55 with an address of your choice. 


Step Five
To verify the change has completed successfully input ifconfig en1 | grep ether into the Terminal window.