| Run Mac OS X on a PC with PearPC |
A simple step-by-step guide with screenshots on how to use the free PearPC emulator to run Mac OS X on your PC without any hardware modifications (completely software based). Provides a simple way to try out the core features of Mac OS X without actually buying Mac/Apple hardware.
**********
Have you ever wondered how it would be like to use Mac OS X, but didn't have a mac, only a PC? Well now you can run Mac OS X on your PC, without any hardware modifications (completely software based), using a PowerPC emulator called PearPC. Read on to find out how you can do this:
**Apple Licensing Issues** - The Apple EULA (End User License Agreement) states that Mac OS X may not be installed on non-Apple hardware. So for this reason, use this guide only as an educational resource.
**News Update** - Now you can get fully blown Mac OS X Tiger emulation with all features using VMware emulation. Read PCWiz's guide here.
Hardware Requirements:
- 2.0GHz (recommended) Intel or AMD processor
- A CD-ROM or DVD-ROM drive
- 700MB or more RAM
- 10-15GB Free Hard Drive Space
- Minimum 12 inch monitor
The minimal configuration will get you about a 40Mhz G3 processor. Try to get the specs as good as you can. My test system was a Pentium D Dual-Core 3Ghz with 1GB or RAM and a Single Layer DVD-RW drive. Even on this system, the estimated acutal speed of the emulated machine was around 60MHz. No matter what computer you have, its always going to be slow.
Software Requirements:
- Mac OS X 10.3 (Apple, $129)
- WinRAR (RarSoft, Shareware)
- PearPC Package (PearPC.NET, free)
- Blank Disk Image (PearPC.sourceforge.net, free)
- Magic ISO Maker (MagicISO Group, Shareware)
The next section will tell you where to download this software.
- WinRAR (RarSoft, Shareware)
- PearPC Package (PearPC.NET, free)
- Blank Disk Image (PearPC.sourceforge.net, free)
- Magic ISO Maker (MagicISO Group, Shareware)
The next section will tell you where to download this software.
Download and Install
You can download everything except Mac OS X. You cannot download Mac OS X off the internet legally. Mac OS X will cost $129 US and will come in a 4 disc set, Install Disk 1, Install Disk 2, Install Disk 3, and Developer Tools. The only disc you will be needing is Install Disc 1. Please note that OEM (machine specific) OS X DVDs/CDs that came with a mac won't work, You have to get a retail copy. To download the other software, just click on the corresponding links:
PearPC package
Magic ISO Maker
WinRAR
6GB Blank Disk Image
Download all the files to My Documents. Installing WinRAR, PearPC Control Panel, and Magic ISO Maker is easy. Just run the setup and follow instructions. However, leave the PearPC.net package_0.1.5a.zip and the pearpc-6gib.img.bz2 files alone. We will deal with that in the "Setting Up your Environment" Section.
Make ISO Images
Now, you will have to make the ISO images for the CDs. Insert the Mac OS X Install Disk 1 into your CD or DVD drive. Unless you have the commercial program "MacDrive 6", your PC will not recognize the CD, that's fine. Now, launch Magic ISO Maker (click "Try It!" at the nag screen) and go to the Tools menu and click "Make ISO from CD/DVD-ROM" option (below).
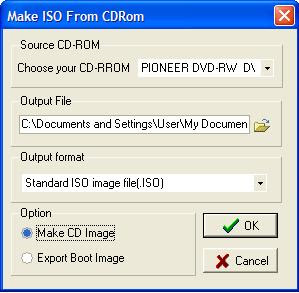 In the "Choose you CD-ROM" menu, choose the drive you inserted the Install Disk 1 into. If you only have 1 drive in your computer, it will automatically be selected. In my case, the drive is PIONEER DVD-RW. For the "Output File" menu, click the little folder icon to bring up a Browse box. Save it in My Documents with the name "Panther1". In the "Output format" menu, choose "Standard ISO image file(.ISO)". Next, make sure the "Make CD image" radio button is checked. Then press the OK button to begin making the ISO. Once its done, close MagicISO.
 Setting Up Your Environment
Now we have to set up the environment. First of all, extract the PearPC.net package_0.1.5a.zip file you downloaded earlier (to My Documents) using WinRAR to the C:\ directory. To do this, double-click on the file, click on the Extract To button, set the "Destination Path" to " C:\" (without quotations) and click OK. Wait a moment while WinRAR extracts it. Next, double click on the file pearpc-6gib.img.bz2 in My Documents you downloaded earlier. This time, follow the same instructions for extracting PearPC.net package_0.1.5a.zip except set the destination path to " C:\PearPC.net package " (without quotations). Now, go check in the C:/ drive (My Computer >> Local Disk C:/). There should be a folder named "PearPC.net package". Inside that folder should be the "pearpc-6gib.img" file. If there isn't a PearPC.net package folder, then you typed in the destination path wrong. Try again.
Now, move the "Panther1.iso" file you created earlier (in My Documents) to theC:\PearPC.net package folder. Now you are ready to begin configuration.
Now, move the "Panther1.iso" file you created earlier (in My Documents) to theC:\PearPC.net package folder. Now you are ready to begin configuration.
Configuring Installation
Open APE Manager from C:/PearPC.net package/Start APE on Windows. This program requires Java. Once loaded, the below screen will appear:
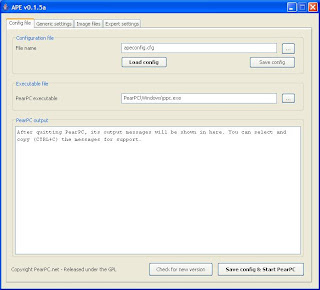 In this tab, name it whatever you like (make sure you have the .cfg extension). I did apeconfig.cfg. Make sure the "PearPC Executable" field reads "PearPC\Windows\ppc.exe" (without quotations). Now, click on the Generic settings tab at the top. It will then bring up the below screen:
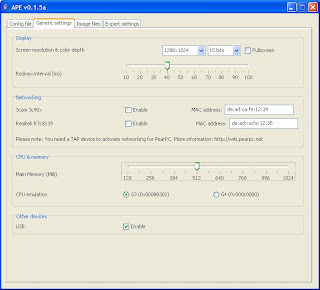
In this tab, set your resolution (800x600, 1024x768, or 1280x1024 depending on your monitor size). Also, you can click the checkbox for Fullscreen if you want but I recommend not to. Don't enable networking, it doesn't work. Set the Main Memory (MiB) to 384 for an average system or 512 for a high-end system. Set the CPU Emulation to G3 (G4 is slow). Enable USB. Leave the rest as default. Click on the Image Files tab to bring up the below screen:
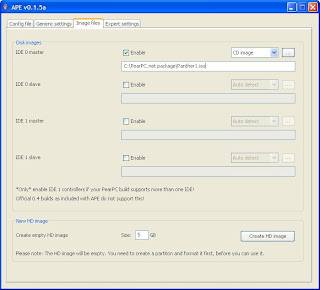 In this tab, make sure the IDE 0 Master and IDE 0 Slave is Enabled (the Enable checkbox). For IDE 0 Master, choose HD image from the drop-down menu. Set the path to "C:\PearPC.net package\pearpc-6gib.img" (without quotations-this is the hard drive image). For IDE 0 Slave, choose CD image from the drop-down menu. Set the path to "C:\PearPC.net package\Panther1.iso" (without quotations). This is the path to the ISO image you created earlier. Thats it! Go back to the Config file tab and click the Save config button.
Mac OS X Installation
At the Config file tab in APE Manager, click "Save config & start PearPC" to boot the virtual machine. Now, the Mac OS X startup screen is going to appear (Grey screen with Apple logo). First thing is **most of the time, you need to try a couple of times for the installation to work, so try again if it doesn't work**. Also, to toggle between the real mouse and the virtual mouse, press F12 (default). The machine will automatically boot to Mac OS X Setup.
Formatting
In the Installer screen, choose the language (English). Then go to the Installer menu >> Open Disk Utility. After Disk Utility loads, choose your hard drive (its going to be called something like "6.0GB EIN GBEUSCH") from the left pane (click on it). Now click the "Erase" tab, which will bring up the format options screen. Set the format to "Mac OS X Extended (Journaled)". Set the name to whatever you like (PearHD, Mac OS X, etc.). Click the Erase button. It will now format your hard drive. It should take 10-60 seconds. Now one the left pane, choose PearHD, or whatever you named your hard drive. Click on the Erase tab and repeat the same process (Set format "Mac OS X Extended Journaled", Set name, and click Erase). Once all the formatting is done, close PearPC (close the entire program) to return to the PearPC Control Panel.
Installation
Double-click the Mac OS X icon again in PearPC Control Panel to start PearPC and the Mac OS X Installer. This time, choose the language and click "Continue". Go through the screens clicking "Continue" and Agreeing to the Terms and Conditions until you reach the "Select your destination" screen where you select your hard-drive. Select it. And click Continue. if your hard drive has a little red marker next to it, you will have to reformat the hard-drive until the red mark goes away (see above). Click Continue to be taken to the Installation Type screen. Here, click the "Options..." button. In the list that shows up, uncheck everything you can (you can't uncheck Essential System Software). Click Install. The installation is painfully slow. It can take around 3 hours. Once installation is complete, PearPC will automatically quit. Congratulations, you have installed Mac OS X.
Boot Mac OS X
This is what everyone has been waiting for. To boot, you have to make some minor changes in APE Manager. Launch APE Manager and in the Config file tab, click the Load config button. Then go the the Image files tab. Change the IDE 0 Slave image file path to "D:\" (or whatever your PC's CD-ROM drive letter is, without quotations) and choose Native CD from the drop-down menu. What this does is it allows your PC's CD-ROM drive to act as the mac's virtual drive so you can install programs from CD's! Your screen should look like this:
 You're done. Go back to the Config file tab and click "Save config & start PearPC". Mac OS X will boot, bringing up the Setup Assistant. Answer some questions and have fun with OS X!. Now anytime you want to boot OS X, open APE Manager, click Load config, and click Save config & start PearPC! Here is proof it actually works:
Have fun with Mac OS X!


