Thursday, October 29, 2009

Run Mac OS X on a PC with PearPC

1 comments
Run Mac OS X on a PC with PearPC


A simple step-by-step guide with screenshots on how to use the free PearPC emulator to run Mac OS X on your PC without any hardware modifications (completely software based). Provides a simple way to try out the core features of Mac OS X without actually buying Mac/Apple hardware.
**********
Have you ever wondered how it would be like to use Mac OS X, but didn't have a mac, only a PC? Well now you can run Mac OS X on your PC, without any hardware modifications (completely software based), using a PowerPC emulator called PearPC. Read on to find out how you can do this:
 
**Apple Licensing Issues** - The Apple EULA (End User License Agreement) states that Mac OS X may not be installed on non-Apple hardware. So for this reason, use this guide only as an educational resource.
 
**News Update** - Now you can get fully blown Mac OS X Tiger emulation with all features using VMware emulation. Read PCWiz's guide here.
 
Hardware Requirements:
 
- 2.0GHz (recommended) Intel or AMD processor
- A CD-ROM or DVD-ROM drive
- 700MB or more RAM
- 10-15GB Free Hard Drive Space
- Minimum 12 inch monitor


The minimal configuration will get you about a 40Mhz G3 processor. Try to get the specs as good as you can. My test system was a Pentium D Dual-Core 3Ghz with 1GB or RAM and a Single Layer DVD-RW drive. Even on this system, the estimated acutal speed of the emulated machine was around 60MHz. No matter what computer you have, its always going to be slow.
 
Software Requirements:
 
- Mac OS X 10.3 (Apple, $129)
- WinRAR (RarSoft, Shareware)
- PearPC Package (PearPC.NET, free)
- Blank Disk Image (PearPC.sourceforge.net, free)
- Magic ISO Maker (MagicISO Group, Shareware)


The next section will tell you where to download this software.
 
Download and Install
 
You can download everything except Mac OS X. You cannot download Mac OS X off the internet legally. Mac OS X will cost $129 US and will come in a 4 disc set, Install Disk 1, Install Disk 2, Install Disk 3, and Developer Tools. The only disc you will be needing is Install Disc 1. Please note that OEM (machine specific) OS X DVDs/CDs that came with a mac won't work, You have to get a retail copy. To download the other software, just click on the corresponding links:

PearPC package

Magic ISO Maker
WinRAR
6GB Blank Disk Image

Download all the files to My Documents. Installing WinRAR, PearPC Control Panel, and Magic ISO Maker is easy. Just run the setup and follow instructions. However, leave the PearPC.net package_0.1.5a.zip and the pearpc-6gib.img.bz2 files alone. We will deal with that in the "Setting Up your Environment" Section.
 
Make ISO Images
 
Now, you will have to make the ISO images for the CDs. Insert the Mac OS X Install Disk 1 into your CD or DVD drive. Unless you have the commercial program "MacDrive 6", your PC will not recognize the CD, that's fine. Now, launch Magic ISO Maker (click "Try It!" at the nag screen) and go to the Tools menu and click "Make ISO from CD/DVD-ROM" option (below).
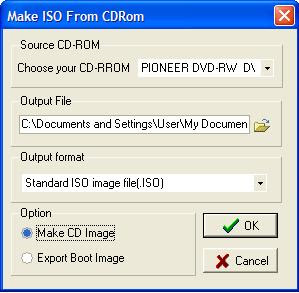
This will bring up the dialog box shown below:
In the "Choose you CD-ROM" menu, choose the drive you inserted the Install Disk 1 into. If you only have 1 drive in your computer, it will automatically be selected. In my case, the drive is PIONEER DVD-RW. For the "Output File" menu, click the little folder icon to bring up a Browse box. Save it in My Documents with the name "Panther1". In the "Output format" menu, choose "Standard ISO image file(.ISO)". Next, make sure the "Make CD image" radio button is checked. Then press the OK button to begin making the ISO. Once its done, close MagicISO.
 
Setting Up Your Environment
 
Now we have to set up the environment. First of all, extract the PearPC.net package_0.1.5a.zip file you downloaded earlier (to My Documents) using WinRAR to the C:\ directory. To do this, double-click on the file, click on the Extract To button, set the "Destination Path" to " C:\" (without quotations) and click OK. Wait a moment while WinRAR extracts it. Next, double click on the file pearpc-6gib.img.bz2 in My Documents you downloaded earlier. This time, follow the same instructions for extracting PearPC.net package_0.1.5a.zip except set the destination path to " C:\PearPC.net package " (without quotations). Now, go check in the C:/ drive (My Computer >> Local Disk C:/). There should be a folder named "PearPC.net package". Inside that folder should be the "pearpc-6gib.img" file. If there isn't a PearPC.net package folder, then you typed in the destination path wrong. Try again.

Now, move the "Panther1.iso" file you created earlier (in My Documents) to theC:\PearPC.net package folder. Now you are ready to begin configuration.
 
Configuring Installation
 
Open APE Manager from C:/PearPC.net package/Start APE on Windows. This program requires Java. Once loaded, the below screen will appear: 
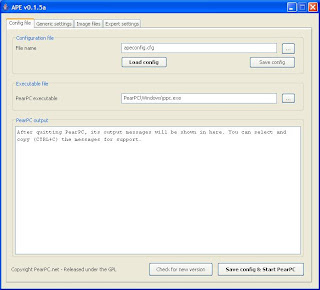
In this tab, name it whatever you like (make sure you have the .cfg extension). I did apeconfig.cfg. Make sure the "PearPC Executable" field reads "PearPC\Windows\ppc.exe" (without quotations). Now, click on the Generic settings tab at the top. It will then bring up the below screen:
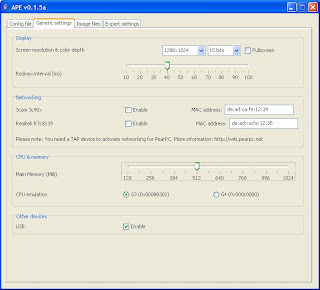
In this tab, set your resolution (800x600, 1024x768, or 1280x1024 depending on your monitor size). Also, you can click the checkbox for Fullscreen if you want but I recommend not to. Don't enable networking, it doesn't work. Set the Main Memory (MiB) to 384 for an average system or 512 for a high-end system. Set the CPU Emulation to G3 (G4 is slow). Enable USB. Leave the rest as default. Click on the Image Files tab to bring up the below screen:
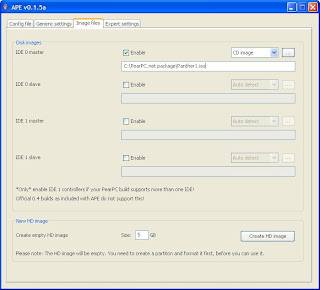
  In this tab, make sure the IDE 0 Master and IDE 0 Slave is Enabled (the Enable checkbox). For IDE 0 Master, choose HD image from the drop-down menu. Set the path to "C:\PearPC.net package\pearpc-6gib.img" (without quotations-this is the hard drive image). For IDE 0 Slave, choose CD image from the drop-down menu. Set the path to "C:\PearPC.net package\Panther1.iso" (without quotations). This is the path to the ISO image you created earlier. Thats it! Go back to the Config file tab and click the Save config button.


Mac OS X Installation
 
At the Config file tab in APE Manager, click "Save config & start PearPC" to boot the virtual machine. Now, the Mac OS X startup screen is going to appear (Grey screen with Apple logo). First thing is **most of the time, you need to try a couple of times for the installation to work, so try again if it doesn't work**. Also, to toggle between the real mouse and the virtual mouse, press F12 (default). The machine will automatically boot to Mac OS X Setup.
 
Formatting
 
In the Installer screen, choose the language (English). Then go to the Installer menu >> Open Disk Utility. After Disk Utility loads, choose your hard drive (its going to be called something like "6.0GB EIN GBEUSCH") from the left pane (click on it). Now click the "Erase" tab, which will bring up the format options screen. Set the format to "Mac OS X Extended (Journaled)". Set the name to whatever you like (PearHD, Mac OS X, etc.). Click the Erase button. It will now format your hard drive. It should take 10-60 seconds. Now one the left pane, choose PearHD, or whatever you named your hard drive. Click on the Erase tab and repeat the same process (Set format "Mac OS X Extended Journaled", Set name, and click Erase). Once all the formatting is done, close PearPC (close the entire program) to return to the PearPC Control Panel.
 
Installation
 
Double-click the Mac OS X icon again in PearPC Control Panel to start PearPC and the Mac OS X Installer. This time, choose the language and click "Continue". Go through the screens clicking "Continue" and Agreeing to the Terms and Conditions until you reach the "Select your destination" screen where you select your hard-drive. Select it. And click Continue. if your hard drive has a little red marker next to it, you will have to reformat the hard-drive until the red mark goes away (see above). Click Continue to be taken to the Installation Type screen. Here, click the "Options..." button. In the list that shows up, uncheck everything you can (you can't uncheck Essential System Software). Click Install. The installation is painfully slow. It can take around 3 hours. Once installation is complete, PearPC will automatically quit. Congratulations, you have installed Mac OS X.
 
Boot Mac OS X
 
This is what everyone has been waiting for. To boot, you have to make some minor changes in APE Manager. Launch APE Manager and in the Config file tab, click the Load config button. Then go the the Image files tab. Change the IDE 0 Slave image file path to "D:\" (or whatever your PC's CD-ROM drive letter is, without quotations) and choose Native CD from the drop-down menu. What this does is it allows your PC's CD-ROM drive to act as the mac's virtual drive so you can install programs from CD's!  Your screen should look like this:

You're done. Go back to the Config file tab and click "Save config & start PearPC". Mac OS X will boot, bringing up the Setup Assistant. Answer some questions and have fun with OS X!. Now anytime you want to boot OS X, open APE Manager, click Load config, and click Save config & start PearPC! Here is proof it actually works:

PROOF 1

PROOF 2

Have fun with Mac OS X!


Flowchart for an Internal Working of a Mac OS

3 comments
Flowchart for an Internal Working of a Mac OS

In the Pictures mentioned below i have mentioned the Flowchart for working Mac OSX and Mac OSX86.
Hope you like it ! These charts explains from Boot to kernal and layers on which Mac OSX works on.
For a Beginner it is a scope of learning internal working of Mac OSX.
Flowchart for OSX                                                       
               
Flowchart for OSX86
      

Requirements to Install Mac OSX86

0 comments
What is OSx86?

OSx86 is the "art" of installing and running Mac OS X on a normal ordinary PC rather than a mac. It has evolved a lot over the many years and now we are very close to perfection.

What is the difference between a native install and a virtual (VMware) install?

A native install is actually installing Mac OS X as a separate operating system and booting it independently like you would boot any other normal OS. A virtual VMware install runs within another operating system (Windows, Linux, etc.) within the VMware application. Native installs are much easier and faster than a virtual machine install and probably the only reason you would want a VMware install nowadays is if you just want to try it out lightly, or if you don't have a place where you can install it.

How hard is it to get OSx86 running?

This really depends. If you have well supported hardware, then it should be easy as installing Windows or any other operating system. If you have tricky hardware that hasn't been tested, then you may experience problems and you may need to take matters into your own hands. One thing is for sure though, if you are uncomfortable with command line operations or troubleshooting, Mac OSx86 won't be nice for you.

What version of OS X should I install?

Right now, you can choose to install Mac OS X Tiger 10.4 or Mac OS X Leopard 10.5. Tiger is more smoothed out, so if you are a beginner it may be best to start out with Tiger, get some experience on the way it works and then gradually move towards Leopard. If you have some previous experience, you can try and make the jump to Leopard. Also, you may have some hardware that only works with one version or the other, so in that case the decision will already be made for you.

Will my hardware work with Mac OSx86?

The first and most important requirement your system MUST have is a processor that supports SSE2 and/or SSE3 instruction sets. You can check this by using CPU-Z for Windows. SSE3 is preferred for running Mac OS X, and SSE2 is getting harder and harder to get to work as the new versions come.

The next step is to find out if your other hardware works. This you can find out pretty easily. There is 2 ways to do this. One is by using the wiki and the other way is to use a search engine. The wiki is generally easier so that's where you should start. Go to the wiki homepage and in the middle of the page, there is a list of HCLs (Hardware Compatibility Lists). Choose the right version of OS X that you are planning to install and choose the right sub category (Desktop computers, Laptops, or Components). Check the lists out and see if your hardware is listed. If your hardware is listed, check the information and see whether it works or not, and what patches or drivers were required to make it work. If your hardware is not listed anywhere, you will have to either just go for it and try it out yourself, or try and find info on it using the second method: using a search engine

If you use a search engine to search for your hardware compatibility with OSx86, then it will cover a much wider range and it will be much more likely that you find info. There are 2 ways to search. One way is to use Google with modifiers:

site:forum.insanelymac.com

Replace Query with your hardware and check the forum results for any information on your specific hardware. The second way is easier, and it uses my Mac OSx86 Search Engine. Type your hardware query into the "InsanelyMac & OSx86 Project Wiki" search box and go.

What is the best hardware for OSx86?

You can find the best hardware by looking at other people's experiences, or looking in the wiki for hardware thats listed as fully compatible. But in a nutshell, this would be generally: A motherboard with a Intel P35 or 975 based chipset (e.g. Gigabyte GA-P35 series, Intel Bad Axe 2, ASUS P5W DH), a GeForce 6600 card or above or an ATI X1300 or higher, and an Intel Core 2 based CPU. There are tons of components that work so its ultimately your decision and your needs that decide what you get.

There are so many distributions available. Which one do I choose?

This will be divided into OS X Tiger and OS X Leopard:

OS X Tiger
For OS X Tiger, there are a ton of distributions you can go with. Eliminate the really old ones (10.4.1-10.4.7) and go for one that is at least 10.4.8. Here is a table of the most popular distributions and their requirements (use this table to choose one that matches your needs):

JaS 10.4.8 AMD Intel SSE2 SSE3
- Compatible with anything
Uphuck 10.4.9 1.3 Series - Yet another universal DVD that is compatible with just about anything
Uphuck 10.4.9 1.4i Series - Intel only installation DVD, and it comes at a tiny file size as well
Uphuck 10.4.9 1.4a - The AMD version of the 1.4i DVD
Kalyway 10.4.10 Intel SSE3 only - Intel SSE3 only 10.4.10 installation DVD
XxX 10.4.10 - Another Intel only DVD but this one supports SSE2 as well
Tubgirl 10.4.10 - An AMD installation DVD for 10.4.10
XxX 10.4.11 - The only 10.4.11 DVD, SSE2 support is untested and some issues with it were reported

OS X Leopard
Leopard doesn't have as many distributions as Tiger but it still has quite a few choices:

Leopard Flat Image
- Preinstalled image of Leopard that you write on a hard drive ; outdated
ToH 10.5.0 RC2 - The first OS X installer DVD ; compatible with SSE2/SSE3 but Intel only
BrazilMac - This is the only DVD that uses an original Leopard DVD and patches it to be hackintosh compatible ; Intel only, SSE2 compatible with a patched kernel
iATKOS 10.5.1 v1.0ir2 - Intel only SSE2/SSE3 installation DVD 10.5.1. Many bootloader issues have been reported with this latest creation from the osx86.turk team
Zephyroth 10.5.1 AMD DVD - AMD only DVD for 10.5.1 installs
Kalyway 10.5.1 - Intel only SSE2/SSE3 DVD, many success stories with this DVD
Zephyroth 10.5.2 Rev. 1 - The first 10.5.2 DVD and its AMD only
Leo4All 10.5.2 Universal - Leo4All is a rather new distro of Leopard OSx86 that works on any Intel/AMD SSE2/SSE3 system
Kalyway 10.5.2 AMD/Intel/SSE2/SSE3 Universal DVD - Newest version of Kalyway that includes the 10.5.2 update. Plus, its AMD compatible

So, it may seem like a hard choice but just choose one and try

Where do I download these DVDs?
 

You can find most of these easily by searching for the DVD name + torrent. Anyway, most of these are available at the usual torrent places: PyrateBay, Mininova and some others. They will come in ISO files, ZIP files, or RAR files ranging anywhere from 1GB to 4.7GB.

How do I partition and format my drive for OSx86

You can partition and format your hard drive for OSx86 by using Disk Utility, which you can access by booting from your OSx86 DVD and going to the Utilities >> Disk Utility option. You have to format your partitions as either Mac OS Extended or Mac OS Extended (Journaled) to be able to boot OS X. You have a couple bootloader options too, GUID or MBR. MBR is recommended if you are installing on a separate hard drive or if you are installing Tiger, and GUID is good for Leopard dual boot installs.

How do I install OS X?

This is not general at all, in the case of most DVDs you just pop it in, boot from it in install. Others like BrazilMac you have to go through a patching, with Leopard flat, you have wriite it to a hard drive. Anyway, some require post install steps, and depending on your hardware you may need specific drivers and patches. This is way too broad of an area so the key word to this is research. Google is your friend.

Some of my hardware is not working. What do I do to get it working?

The first place you should look for solutions to your hardware problems is Rammjet's excellent series of how to's for various hardware. He has tutorials for Video, Keyboards/Trackpads/Mice, Wireless, Ethernet, Audio, and Micellaneous solutions. You will likely find solutions for your hardware in there. If you don't find solutions, the other way to get info is to use the research tips I outlined in "What hardware will work with OSx86" (using Google with modifiers, the OSx86 Search Engine, or the wiki).

You can also manually search for drivers in the X Labs.

Where can I get a general installation guide?


You can find general installation guides in several places. Once place would be the Installation GuidesGenius Bar. And the other place is the OSx86 10.4 and OSx86 10.5 forums. You can also find guides that are on external sites other than InsanelyMac and the OSx86 Project by using Google.

Where can I get a specific installation guide for my hardware?

The first place to look would be the Genius Bar in InsanelyMac. There are tons of tutorials for various video cards, motherboards, audio, and just about everything else. Search through a few pages and see if you can find anything. If you can't find a tutorial manually, once again, research using...once again: Google with search modifiers, the OSx86 Search Engine, or the wiki. You can also find guides that are on external sites other than InsanelyMac and the OSx86 Project by using Google. Can I update my software using Apple Software Update?

This depends. First of all, any OSx86 machine will probably take any update except for the system updates that update your system to a new version (e.g. 10.4.9 --> 10.4.10). If you have PC EFI installed (covered next), then you can install any update without worry. If you are using patched kernels and extensions, then you can't install system updates without using a specialized OSx86 updater package or without restoring the patched kernel and extensions. If you install an Apple system update while using patched kernels and extensions you will break your installation. NOTE: The new 10.5.2 update needs a specialized install process.

What is PC EFI?

EFI stands for Extensible Firmware Interface which is the "BIOS" used in Intel Macs. This is what allows the mac to work like a mac and be recognized like a mac. Up until now, we had to used patched kernels and patched extensions to make it work. But now, hacker netkas has developed an PC EFI system where the EFI code is injected into the bootloader, making OS X think that you are using a real mac. This allows for the installation of default Apple extensions and kernels (AKA vanilal kernels). This also means that you can update your software directly from Apple software update without damaging it.

What are the system requirements for PC EFI?

The system requirements for PC EFI are quite simple. For just plain old PC EFI with no vanilla kernel all you need is a working Leopard or Tiger install and that's it. But if you want to use a vanilla kernel (Apple's kernel), then you also need a Core 2 series or a Pentium Dual Core (NOT Pentium D) processor.

How do I install PC EFI?

If you are installing Leopard, you have 2 options: either installing it from your OSx86 DVD (if your OSx86 DVD has an option to install PC EFI) or if you want more control, you can install it manually. If you have Tiger, your only option is to install it manually. If your install DVD contains an option for installing PC EFI, select it and install and PC EFI will automatically be installed. If you are installing manually, then your best option is to use i am...me's EFI v8 installation guide here.

How do I dual boot OSx86 and another OS?


This can get extremely tricky, with all the bootloaders and the mess. If you are dual booting linux and OSx86, your best option is to use the GRUB bootloader or Acronis OS Selector. If you are dual booting OSx86 and Windows XP there is an easy option, chain0. If you are dual booting Vista and OSx86 you can use the existing Vista bootloader with some edits using the EasyBCD tool. There are many dual booting guides available, once again check the places I outlined earlier, the Installation Guides section of the wiki, the InsanelyMac Genius Bar, and use Google to search for tutorials on external sites.

Can I install OS X from a retail Leopard DVD?

Yes, this is possible. Please go here for a very detailed 10.5.2 Retail Leopard install guide. Basically the procedure is you put in the DVD, and using Terminal you start installing OS X from OSInstall.mpkg onto your internal or external HD. Then you would install PC_EFI and install the dsmos.kext decrypter. Then last, you would install some modified kexts.

I have a error or problem while installing. What should I do?

Again, the first thing you should do is research with the research tips I repeated at least 3 times (Google, Mac OSx86 Search Engine, wiki). Thoroughly research any errors you are getting in those three resources and 90% of the time you will find a solution, because chances are that you are not the first one to experience these problems. If you absolutely cannot find anything, then that's your cue to make a nice polite, non-demanding topic on the forums (and I might say, in the CORRECT forum) asking for help. You will need to list your system specifications, what install DVD/method you are using, and any errors you are getting. You will need to post your problem in one of the subforums of the Homebrew Macs (Home of OSx86) section. Make sure you post in the right subforum, use your common sense.

How do I find out device IDs for my hardware?

Device IDs are commonly used to add to kexts to get certain hardware working, or to identify specific versions or revisions or hardware like video cards. The easiest way to find out device IDs is by using a free utility called DPCI Manager. Download and run the utility and it will list your hardware devices and their corresponding device IDs.

Where can I download the latest kernels

The latest kernels can be downloaded from the IRC channel irc.osx86.hu. You have to use an IRC client like Colloquy if you are on OS X or Xchat if you are on Windows to connect to the server. Once connected, if you want kernels for your version of OS X you have to connect to a room. For example, if you want kernels for Leopard you would connect to room #10.5 If you wanted kernels for Tiger you would connect to #10.4. Once you are connected to a room the kernel download links will be listed at the top.
section of the wiki. Another place would be the InsanelyMac
How do I install kernels?

One way to install kernels would be through a helper application like PCWiz OS X Kernel Installer, which automatically installs kernels for you through a guided wizard. There is also a manual way to install the kernel. Here's how: Place the kernel file on your desktop and rename it to mach_kernel. Then, open up the Terminal program from Applications >> Utilities and run the following commands:

sudo -s
[enter password]
cp -R /mach_kernel /mach_kernel.backup
cp -R ~/Desktop/mach_kernel /mach_kernel


It is always a good idea to repair permissions after the kernel install using Disk Utility (Applications >> Utilities, select your volume from left pane and click Repair Permissions). Restart the computer for the kernel changes to take effect. If your new kernel is causing mess ups and instability, you can boot using the old kernel by going to the F8 boot prompt (press F8 when OS X is loading) and typing in mach_kernel.toh and pressing Enter (assuming that you used the exact commands above)

How do I install kexts (Kernel Extensions)?

The easiest way to install kexts (Kernel Extensions, usually some sort of driver) is to use a helper application like Kext Helper that automatically installs the kexts for you. The other way is a manual method: Put the kext you want to install on the Desktop. Next, if you are planning to replace a kext that is already installed with a different version, run the following commands from Terminal (Applications >> Utilities) to back it up:


sudo -s
[enter password]
mkdir /KextBackup/
cp -R /System/Library/Extensions/name_of_kext.kext /KextBackup/


Once you are done backing up (or if you are installing a completely new kext), after making sure the kext is on the Desktop, run these commands with Terminal:


sudo -s
[enter password]
cp -R ~/Desktop/name_of_kext.kext /System/Library/Extensions/
chown -R root:wheel /System/Library/Extensions/name_of_kext.kext
chmod -R 755 /System/Library/Extensions/name_of_kext.kext
rm -rf /System/Library/Extensions.mkext


Replace "name_of_kext" in these commands with the actual file name of the kext you are installing. Reboot for the changes to take effect.

Why is there a time difference in Mac OS X and Windows dual boots?


As you may have already noticed, there is always a time change when dual booting Mac OS X and Windows, whether it be with Boot Camp or a hackint0sh. After booting into OS X and going into Windows (or vice versa) the time always gets messed up. Various solutions have been posted, and this
page sums up all the solutions so you can try all the various solutions for this problem and see if one works for you.

Tuesday, October 27, 2009

HOW TO SHOW HIDDEN FILES IN MAC

0 comments
HOW TO SHOW HIDDEN FILES IN MAC


Click on Terminal under Applications:Utilities.

Enter the following commands in the terminal window. (Press enter after each line).

defaults write com.apple.finder AppleShowAllFiles TRUE
killall Finder

After this your Finder will restart and you will be able to see hidden files!


Monday, October 26, 2009

Install Printer on Mac

0 comments
Install Printer on Mac !

If your printer does not appear in the Printer pop-up menu, find and install the appropriate driver. Check any CD-ROM discs included with the printer, or the website of your printer's manufacturer. Only users with an administrator account can install software.

Check the Printer menu again after installing the software. If the printer does not appear, you may need to do this:
  1. Make sure the printer is connected to your computer, plugged in, and turned on.
  2. For Mac OS X 10.2.8 or earlier, from the Printer menu in the print dialog choose Edit Printer List. The Printer List window appears.
  3. For Mac OS X 10.3 or later, choose Show Printer List from the View menu. The Printer List window appears.
  4. Click the Add Printer button.
  5. Choose USB from the first pop-up menu.
  6. Select your printer from the list.
  7. Click Add.
  8. Close the Printer List window.
How to add a network printer (AppleTalk or LPR)

Adding an AppleTalk or LPR network printer is very similar to adding a USB printer. In Step 4 above, you would choose AppleTalk or "LPR Printers using IP" from the pop-up menu. From there, the setup differs slightly.

AppleTalk printer
  • AppleTalk must be enabled in Network preferences.
  • If your network uses AppleTalk zones, choose one from a second pop-up menu that appears.
  • Make sure to avoid potential issues with AppleTalk multi-homing.

LPR printer
  • You must enter the printer's IP address or DNS name.
  • If you're printing to a queue, deselect the checkbox for "Use Default Queue on Server", then type the queue's name. If not, leave the checkbox selected.
  • You can select your printer from the Printer Model menu or leave it at Generic. In essence, are selecting a PPD file.

Basic Terminal Commands used in Mac

0 comments
Terminal Commands used in Mac !

a
  alias     Create an alias •
  alloc     List used and free memory
  awk       Find and Replace text within file(s)
b
  basename  Convert a full pathname to just a folder path
  bash      Bourne-Again SHell
  bg        Send to background •
  bind      Display readline key and function bindings •
  bless     Set volume bootability and startup disk options.
  break     Exit from a For, While, Until or Select loop •
  builtin   Execute a shell builtin •
  bzip      Compress or decompress files
c
  cal       Display a calendar
  caller    Return the context of a subroutine call •
  case      Conditionally perform a command •
  cat       Display the contents of a file
  cd        Change Directory •
  chflags   Change a file or folder's flags
  chgrp     Change group ownership
  chmod     Change access permissions
  chown     Change file owner and group
  chroot    Run a command with a different root directory
  cksum     Print CRC checksum and byte counts
  clear     Clear terminal screen
  cmp       Compare two files
  comm      Compare two sorted files line by line
  command   Run a command (not a function) •
  complete  Edit a command completion [word/pattern/list] •
  continue  Resume the next iteration of a loop •
  cp        Copy one or more files to another location
  cron      Daemon to execute scheduled commands
  crontab   Schedule a command to run at a later date/time
  cut       Divide a file into several parts
d
  date      Display or change the date & time
  dc        Desk Calculator
  dd        Data Dump - Convert and copy a file
  declare   Declare variable & set attributes •
  defaults  Set preferences, show hidden files
  df        Display free disk space
  diff      Display the differences between two files
  diff3     Show differences among three files
  dig       DNS lookup
  dirname   Convert a full pathname to just a path
  dirs      Display list of remembered directories •
  diskutil  Disk utilities - Format, Verify, Repair
  disown    Unbind a job from the current login session •
  ditto     Copy files and folders
  dot_clean Remove dot-underscore files
  drutil    Interact with CD/DVD burners
  dscacheutil Query or flush the Directory Service/DNS cache
  dscl      Directory Service command line utility
  du        Estimate file space usage
e
  echo      Display message on screen •
  ed        A line-oriented text editor (edlin)
  enable    Enable and disable builtin shell commands •
  env       Set environment and run a utility
  eval      Evaluate several commands/arguments •
  exec      Execute a command •
  exit      Exit the shell •
  expand    Convert tabs to spaces
  expect    Programmed dialogue with interactive programs
            Also see AppleScriptexport    Set an environment variable •
  expr      Evaluate expressions
f
  false     Do nothing, unsuccessfully
  fc        Fix command (history)
  fdisk     Partition table manipulator for Darwin UFS/HFS/DOS
  fg        Send job to foreground •
  file      Determine file type
  find      Search for files that meet a desired criteria
  fmt       Reformat paragraph text
  fold      Wrap text to fit a specified width
  for       Loop command •
  fsck      Filesystem consistency check and repair
  fsaclctl  Filesystem enable/disable ACL support
  fs_usage  Filesystem usage (process/pathname)
  ftp       Internet file transfer program
g
  GetFileInfo Get attributes of HFS+ files
  getopt    Parse positional parameters
  getopts   Parse positional parameters •
  goto      Jump to label and continue execution
  grep      Search file(s) for lines that match a given pattern
  groups    Print group names a user is in
  gzip      Compress or decompress files
h
  hash      Refresh the cached/remembered location of commands •
  head      Display the first lines of a file
  hdiutil   Manipulate iso disk images
  history   Command History •
  hostname  Print or set system name
i
  id        Print user and group names/id's
  if        Conditionally perform a command •
  info      Help info
  install   Copy files and set attributes
j
  jobs      List active jobs •
  join      Join lines on a common field
k
  kextfind  List kernel extensions
  kickstart Configure Apple Remote Desktop
  kill      Stop a process from running
l
  l         List files in long format (ls -l)
  last      Indicate last logins of users and ttys
  launchctl Load or unload daemons/agents
  ll        List files in long format, showing invisible files (ls -la)
  less      Display output one screen at a time
  let       Evaluate expression •
  lipo      Convert a universal binary
  ln        Make links between files (hard links, symbolic links)
  local     Set a local (function) variable •
  locate    Find files
  logname   Print current login name
  login     log into the computer
  logout    Exit a login shell (bye) •
  lpr       Print files
  lprm      Remove jobs from the print queue
  lpstat    Printer status information
  ls        List information about file(s)
  lsregister Reset the Launch Services database
  lsbom     List a bill of materials file
  lsof      List open files
m
  man       Help manual
  mdfind    Spotlight search
  mdutil    Manage Spotlight metadata store
  mkdir     Create new folder(s)
  mkfifo    Make FIFOs (named pipes)
  more      Display output one screen at a time
  mount     Mount a file system
  mv        Move or rename files or directories
n
  net       Manage network resources
  netstat   Show network status
  networksetup Network and System Preferences
  nice      Set the priority of a command
  nohup     Run a command immune to hangups
  ntfs.util NTFS file system utility
o
  onintr    Control the action of a shell interrupt
  open      Open a file/folder/URL/Application
  osacompile Compile Applescript
  osascript Execute AppleScript
p
  passwd    Modify a user password
  paste     Merge lines of files
  pbcopy    Copy data to the clipboard
  pbpaste   Paste data from the Clipboard
  pico      Simple text editor
  ping      Test a network connection
  pkgutil   Query and manipulate installed packages
  plutil    Property list utility
  pmset     Power Management settings
  popd      Restore the previous value of the current directory •
  pr        Convert text files for printing
  printenv  Print environment variables
  printf    Format and print data •
  ps        Process status
  pushd     Save and then change the current directory
  pwd       Print Working Directory •
q
  quota     Display disk usage and limits
r
  rcp       Copy files between machines
  read      Read one line from standard input •
  readonly  Mark a variable or function as read-only •
  reboot    Stop and restart the system
  return    Exit a function •
  rev       Reverse lines of a file
  rm        Remove files
  rmdir     Remove folder(s)
  rpm       Remote Package Manager
  rsync     Remote file copy - Sync file tree (also RsyncX)
s
  say       Convert text to audible speech
  screen    Multiplex terminal, run remote shells via ssh
  screencapture Capture screen image to file or disk
  sdiff     Merge two files interactively
  security  Administer Keychains, keys, certificates and the Security framework
  sed       Stream Editor
  select    Generate a list of items •
  set       Set a shell variable = value •
  setfile   Set attributes of HFS+ files
  shift     Shift positional parameters •
  shopt     Set shell options •
  shutdown  Shutdown or restart OS X
  sleep     Delay for a specified time
  softwareupdate System software update tool
  sort      Sort text files
  source    Execute commands from a file •
  split     Split a file into fixed-size pieces
  stop      Stop a job or process
  su        Substitute user identity
  sudo      Execute a command as another user
  sum       Print a checksum for a file
  suspend   Suspend execution of this shell •
  sw_vers   Print Mac OS X operating system version
  system_profiler  Report system configuration
  systemsetup Computer and display system settings
t
  tail      Output the last part of files
  tar       Tape ARchiver
  tee       Redirect output to multiple files
  test      Condition evaluation •
  textutil  Manipulate text files in various formats (Doc,html,rtf)
  time      Measure Program Resource Use
  times     Print shell & shell process times •
  touch     Change file timestamps
  tr        Translate, squeeze, and/or delete characters
  trap      Execute a command when the shell receives a signal •
  traceroute Trace Route to Host
  true      Do nothing, successfully
  tty       Print filename of terminal on stdin
  type      Describe a command •
u
  ufs.util  Mount/unmount UFS file system
  ulimit    limit the use of system-wide resources •
  umask     Users file creation mask
  umount    Unmount a device
  unalias   Remove an alias •
  uname     Print system information
  unexpand  Convert spaces to tabs
  uniq      Uniquify files
  units     Convert units from one scale to another
  unset     Remove variable or function names •
  until     Loop command •
  users     Print login names of users currently logged in
  uuencode  Encode a binary file 
  uudecode  Decode a file created by uuencode
  uuidgen   Generate a Unique ID (UUID/GUID)
  uucp      Unix to Unix copy
v
  vi        Text Editor
w
  wait      Wait for a process to complete •
  wc        Print byte, word, and line counts
  where     Report all known instances of a command
  which     Locate a program file in the user's path
  while     Loop command •
  who       Print all usernames currently logged on
  whoami    Print the current user id and name (`id -un')
  write     Send a message to another user
x
  xargs     Execute utility - passing arguments
  yes       Print a string until interrupted
  

Setup Gmail Account in Entourage

4 comments
Open your Entourage and go to account settings and after that click on New to create New Account for settings up new gmail account in entourage.

You will  be asked for account type, select pop and it will open settings in page.
Now configure the settings as mentioned  below.

Enter Incoming Mail Server: ‘pop.gmail.com’
Enter your Gmail username (including ‘@gmail.com’) in the ‘User Name:’ field.
Enter your Gmail password in the ‘Password:’ field.
Select ‘Add Server…’ from the pop-up labeled and type ‘Outgoing Mail Server,’: smtp.gmail.com.
Enter ‘587′ in the ‘Server port:’ field.
Check the box next to ‘Use Secure Sockets Layer (SSL).’
Select ‘Password’ next to ‘Authentication:’ and enter your Gmail username (including ‘@gmail.com) and Gmail password.
Click ‘OK.’
Click ‘Advanced’ and check the box next to ‘Use SSL.’ (The port changes to ‘995.’).

Click on send and receive in the entourage and you will be able to fetch emails with no issues.  

Saturday, October 24, 2009

HIDE HIDDEN FILES IN MAC

0 comments
HIDE HIDDEN FILES IN MAC

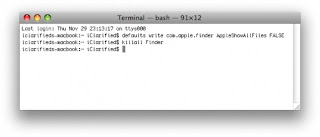
Open a new Terminal window under Applications:Utilities.

Enter the following commands in the terminal window. (Press enter after each line).

defaults write com.apple.finder AppleShowAllFiles FALSE
killall Finder


Your Finder will restart and you will NOT be able to see hidden files!